Now that we’ve covered half of the stages that you’ll find at most sanctioned Steel Challenge matches, it’s time to move on to some of the more interesting stages that tend to give new shooters, and even some seasoned veterans, pause. This can be because of the perceived difficulty of the stage and the apparently numerous different orders that one can choose to shoot each stage. My hope is that by the end you see that none of these stages are really that difficult, with the possible exception of Outer Limits. (We’re going to leave Outer Limits until last because it poses many challenges not found on any of the other seven Steel Challenge stages.)
More importantly, however, you should also see that in each case there really is one shooting order that is far superior to all others. It’s one for which you should strive to develop your skills to the point where you can exploit all the advantages that particular shooting order offers. So we’ll start the second half of our stage shooting discussion with a stage that has a unique feature not found on any other stage—we’re going to talk about Five To Go.
Five to Go is considered by many shooters as one of the more difficult stages, but it doesn’t have to be. It’s the only stage with four 10-inch round plates, and people seem to get intimidated by this. If you start by looking at the stage setup you see the plate distances are only 10 yards, 12 yards, 15 yards, 18 yards and seven yards for the stop plate, which is 12 inches in diameter. Also, note that the arrangement of the plates allows you to select a shooting order where you don’t have to perform a reverse transition to get to the stop plate.
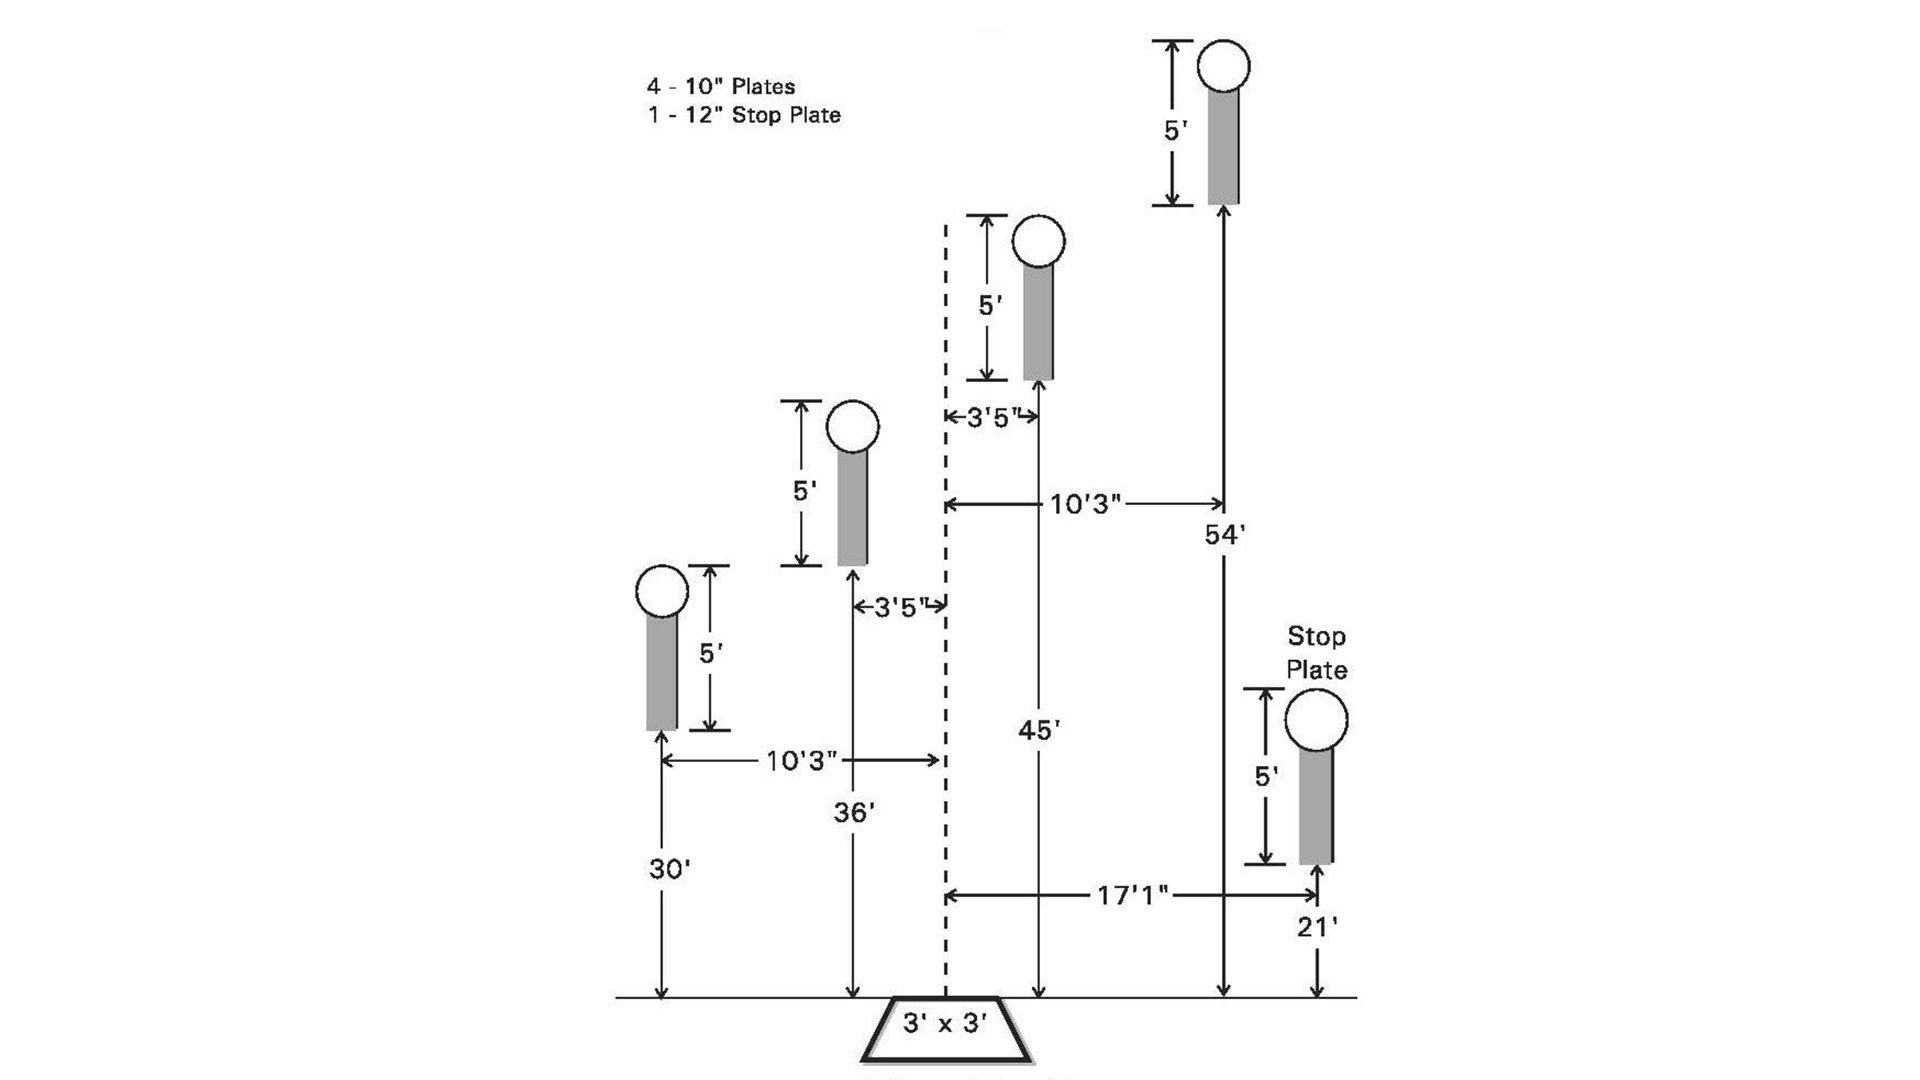
This, in fact, is unique among all Steel Challenge stages, and is the only stage where this is possible; it therefore makes the Five To Go stage easier and not more difficult than the other stages. As I’ve discussed many times, you always want to avoid doing more than one reverse transition on a stage, because each one adds complexity, slows you down and is a major cause of make-up shots and outright uncalled-for misses and the resulting devastating three-second penalty. If you can select a shooting order with no reverse transitions than this, it is a major plus.
Pace is extremely important and the number one attribute to shooting this stage well. Many shooters really try to rush the last transition from No. 4 to the stop plate and end up taking make-up shots on what otherwise would be good runs. You want to avoid this classic mistake at all costs. After a good, solid aggressive first shot, I try not to either speed up or slow down as I shoot the next four plates. Don’t get fooled into believing you need to really push the last transition off No. 4 to make up time because it’s a fairly wide transition. Unless you’ve already developed a strong mental management program, this is where you typically trick yourself into believing that you need to “make up time” and go faster. This almost always leads to problems, such as missing plate No. 4, now requiring a make-up shot, or being too aggressive on the transition to the stop plate and either missing the stop plate altogether or over-swinging the transition, requiring you to move your gun back onto the target. The key here in executing the transition from No. 4 to the stop plate is to do it at about the same speed as the transition from No. 3 to No. 4 which should be about right.
When training, use your PACT timer to look at transition times between the plates to develop what it feels like to shoot each transition at the same pace. A great drill for this is the “Big Plates/Little Plates” drill found on page 147 of my training book. This drill is specifically designed to teach you to shoot multiple transitions all at exactly the same pace. Another good one is the “Enos Transition Drill” on page 145 of my book.
With respect to shooting order there are only two options on this stage, with the first one I’ll mention being the overwhelming favorite—either shoot it 1, 2, 3, 4 and stop, or 4, 3, 2, 1 and stop. Shooting 1, 2, 3, 4 and stop has several advantages. First, you’ll be shooting from left to right which most right-handed shooters prefer. Second, you’ll be drawing to the closest and therefore easiest target, allowing you to get off to a good, aggressive start. In addition, as the targets get progressively farther away, you are already lined up on them, allowing for an easier transition.
When I’m training on this stage, as I mentioned earlier, I pay careful attention to my transition times, since I want them all to be as close to the same as possible, ensuring I’m shooting at an even pace. One other thing I like to do is stand in the extreme right corner of the shooting box; this allows the last transition from No. 4 to the stop plate to be slightly shorter and therefore slightly easier. It does make for a slightly longer turn on the draw/first shot, but since that is only at 10 yards, I’d rather do that if it means I can gain even a small advantage on the stop plate transition.
Let’s take a quick look at the other shooting order I mentioned which, for the vast majority of shooters, is not really worth considering. I toyed with this order for about two months at one point and ended up going back to my original order of 1, 2, 3, 4 and stop. So why would anyone want to draw to the most difficult plate (No. 4) and then add an extremely long final transition from No. 1 to the stop plate?
If your skills are up to it and drawing to an 18-yard, 10-inch target is not that challenging for you, then this shooting order enables you to actually speed up as you progress through the stage, since the plates are getting progressively closer. I know that I said earlier that you should strive for an even pace between targets, but if you are shooting targets that are getting progressively closer, instead of progressively farther away, then there is no reason you should not be shooting them quicker.
This is clearly an advanced technique and not one I will recommend, unless the student in question is already a legitimate Grand Master and looking to shave every tenth of a second possible from his or her time. It also reintroduces a reverse transition (another reason not to select this order), which usually adds time to a run. The only shooters I’ve ever seen shoot the stage successfully in this order were a couple of the “super squad” shooters at Nationals many years ago. Even with that, pretty much everyone now shoots the stage 1,2, 3, 4 and stop. I’ve included it here for completeness, not as a recommended way of approaching this stage.
So hopefully now you can see that Five To Go does not have to be that intimidating to shoot. With a little practice and incorporation of the tips in this article, you should feel quite comfortable shooting this stage in no time. And as always, remember—slowing down is never the right answer, never. You need to learn to see faster.
Article from the July/August 2024 issue of USPSA’s magazine.


